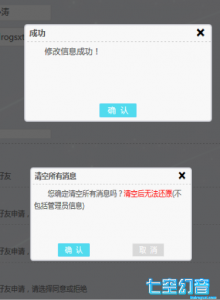

前段时间做ACG Balrogs的时候感觉系统自带的alert与confirm非常难看,所以百度了一下这两个的自定义,但是一看百度上面的代码!WTF?什么鬼,根本看不懂,对于我这种js渣来说简直是在看天书了,所以想了半天终于自己搞出来了一个自定义的弹窗样式,接下来我就和大家来分享一下这串代码 效果图如下:

基本只用html和css设计一下弹窗的结构和样式在用javascript让这个弹窗运行起来即可。 html首先要设置一层遮罩层,就是如上图后面所看到的浅黑背景,这样做的目的就是让弹窗出现后用户不可以点击后面的元素。之后将弹窗的框上下居中设置框内样式即可之后设置js函数后触发并传递标题和内容还有附带的一个类型(类型之后会说到有什么用的)。 首先上HTML结构代码与CSS代码,JS代码我会详细叙述:
HTML:
<!--alert的HTML-->
<div id="zhezhao">
    <div class="alert">
        <p class="alert_top">
            <span id="alert_title"></span><!--不需要大家在这里直接设置标题-->
            <span class="alert_exit icon" onclick="exit_btn()" style="font-size:18px;font-weight: bold;">x</span><!--此处的x大家可以用font字体代替使用比较好看-->
        </p>
        <p id="alert_content"></p><!--也不需要大家在这里直接设置内容-->
        <div class="alert_button">
            <input type="button" value="确  认" class="alert_ok_btn" id="true_btn" onclick="true_btn()"/>
        </div>
    </div>
</div>
<!--alert end-->
<!--confirm的HTML-->
<div id="confirm">
    <div class="alert">
        <p class="alert_top">
            <span id="confirm_title"></span>
            <span class="alert_exit icon" onclick="exit_btn()" style="font-size:18px;font-weight: bold;">x</span>
        </p>
        <p id="confirm_content"></p>
        <div class="alert_button">
            <input type="button" value="确  认" class="select_alert_ok_btn" id="select_true_btn" onclick="true_btn()"/>
            <input type="button" value="取  消" class="select_alert_no_btn" id="select_false_btn" onclick="true_btn()"/>
        </div>
    </div>
</div>
CSS:
<style>
        *{/*由于我这里只有弹窗所以直接就使用通配符了*/
            margin:0;
            padding:0;
        }
        #zhezhao,
        #confirm{/*定义alert和confirm的遮罩层浅黑透明,高度宽度都为100%*/
            background:rgba(0,0,0,0.6);
            height:100%;/*继承父类,如果父类不是100%请自行设置*/
            width:100%;
            position:fixed;/*固定遮罩层*/
            top:0;/*设置位置,这个很重要,如果不设置有可能导致位置错乱*/
            left:0;
            display:none;/*首先隐藏,弹出后处于最顶层*/
            z-index:99999999999;
        }
        .alert{
            overflow:hidden;
            border:2px solid #d4d5dc;
            height:150px;
            width:300px;
            border-radius:5px;
            background: rgb(248, 248, 248);
            position:fixed;
            top:50%;/*让他绝对居中*/
            left:50%;
            margin-top:-180px;
            margin-left:-160px;
            z-index:999999999999;
        }
        /*之后就没有什么特别需要讲的css样式了*/
        .alert_top{
            width:100%;
            height:25px;
            line-height:25px;
            color:#000;
            text-indent:.5em;
            border-bottom:1px dashed #ccc ;
        }
        #alert_content,
        #confirm_content {
            margin:5px 5px 2px;;
            width:auto;
            height:90px;
            line-height:20px;
            overflow:hidden;
            text-indent:2em;
            color:#555;
            font-size:14px;
        }
        #alert_title,
        #confirm_title{
            float:left;
            font-weight: bold;
            color:#555;
            font-size:12px;
        }
        .alert_exit{
            float:right;
            margin-right:10px;
            width:auto;
            font-size:13px;
            height:100%;
            cursor:pointer;
        }
        .alert_button{
            width:100%;
            height:35px;
        }
        .alert_ok_btn{
            margin-bottom:15px;
            margin-left:auto;
            margin-right:auto;
            display:block;
            width:60px;
            border:1px solid #5ad4f4;
            background: #51dbee;
            color:#fff;
            border-radius:2px;
            cursor:pointer;
        }
        .alert_ok_btn:hover{
            border:1px solid #57c2e0;
            background: #4cccde;
        }
        .select_alert_ok_btn{
            margin-bottom:15px;
            width:60px;
            border:1px solid #5ad4f4;
            background: #51dbee;
            color:#fff;
            border-radius:2px;
            cursor:pointer;
            float:left;
            margin-left:50px;

        }
        .select_alert_ok_btn:hover{
            border:1px solid #57c2e0;
            background: #4cccde;
        }
        .select_alert_no_btn{
            margin-bottom:15px;
            margin-left:50px;
            width:60px;
            border:1px solid #eaeaea;
            background: #d9d9d9;
            color:#fff;
            border-radius:2px;
            cursor:pointer;
            float:right;
            margin-right:50px;

        }
        .select_alert_no_btn:hover{
            border:1px solid #bababa;
            background: #ababab;
        }
    </style>
最关键的就是javascript了 我先把js代码贴出来,在一个一个的讲述。
JS:
<script>
//alert的自定义函数
//参数我设置了3个,第一个是标题,第二个是内容,第三个则是传递的类型(也可以叫确定触发的函数,可选项)
    function alert_start(a_title, a_content, a_type) {
        document.getElementById("zhezhao").style.display = "block";//首先点击触发alert弹窗函数后将他显示出来
        document.getElementById("alert_title").innerHTML = a_title;//然后将传递的标题使用innerHTML替换为弹窗标题
        document.getElementById("alert_content").innerHTML = a_content;//这个也是将传递的内容替换为弹窗内容
        //下一步则是在文档中找到名为true_btn的id属性为onclick(此处的getAttributeNode是和JQ的attr属性差不多)
        var true_btn = document.getElementById("true_btn").getAttributeNode("onclick");
        //判断如果传递了类型属性就会使用(这是可选项)
        if(a_type!=""){
            //此处需注意一下:如果你选择使用函数的话无需更改,如果你要直接使用js代码的话 将+"()"删除掉
//传递的类型,这个地方你可以这样理解:true_btn的onclick 通过nodeValue就可以获取onclick的值
//在这里就可以将a_type的值替代原有的onclick的值
            true_btn.nodeValue=a_type+"()";
        }
        //这也是可选项,在窗口弹出的时候禁止用户右键点击,需要无需修改,不需要请删除,下面也有此类代码
        oncontextmenu = function () {
             return false;
         }
    }

//confirm的自定义函数
//同alert弹窗一样的参数代码可参考alert的来查看,这里我就不多说了
    function confirm_start(c_title,c_content,c_type){
        document.getElementById("confirm").style.display = "block";
        document.getElementById("confirm_title").innerHTML = c_title;
        document.getElementById("confirm_content").innerHTML = c_content;
        var true_btn = document.getElementById("select_true_btn").getAttributeNode("onclick");
        if(c_type!=""){
            true_btn.nodeValue=c_type+"()";
        }
        oncontextmenu = function () {
             return false;
         }
    }
//默认确认按钮
    function true_btn() {
        document.getElementById("zhezhao").style.display = "none";//将alert与confirm隐藏
        document.getElementById("confirm").style.display = "none";
        oncontextmenu = function () {//设置右键禁止的可以使用,如果没有设置删除代码即可
            return true;
        }
        return true;
    }
    function exit_btn() {
        document.getElementById("confirm").style.display = "none";//将alert与confirm隐藏
        document.getElementById("zhezhao").style.display = "none";
        oncontextmenu = function () {
            return true;
        }
        return false;
    }
//上面两个自定义函数代码都差不多,但是最后面都返回的不同值,其实我最后才发现也没有什么用了,大家删掉就行了
</script>
如何来触发这两个弹窗呢?
<!--肯定是用onclick或者href等等来触发咯~-->
<button onclick="alert_start('标题','这是一个alert弹窗内容','')">alert弹出</button>
<button onclick="confirm_start('标题','这是一个confirm弹窗内容','')">confirm弹出</button>
两个参数均为相同,第一个为标题,第二个为提示的内容,第三个为自定义函数或直接使用的函数(类型~)明白就行了 为了避免大家看了代码后,使用中无法使用,我将文件打包,大家可以自行下载,不懂的可以在评论回复 哦,对了~弹窗的内容可以使用标签~
1条评论登录后可见